Cara Registrasi Tim ke dalam Event di Basketyuk (IBIS)
Daftarkan Tim dan Lengkapi Roster dengan Mudah
Panduan ini disusun berdasarkan Team and Roster Registration Guide Rev.2 (26.01.2026).
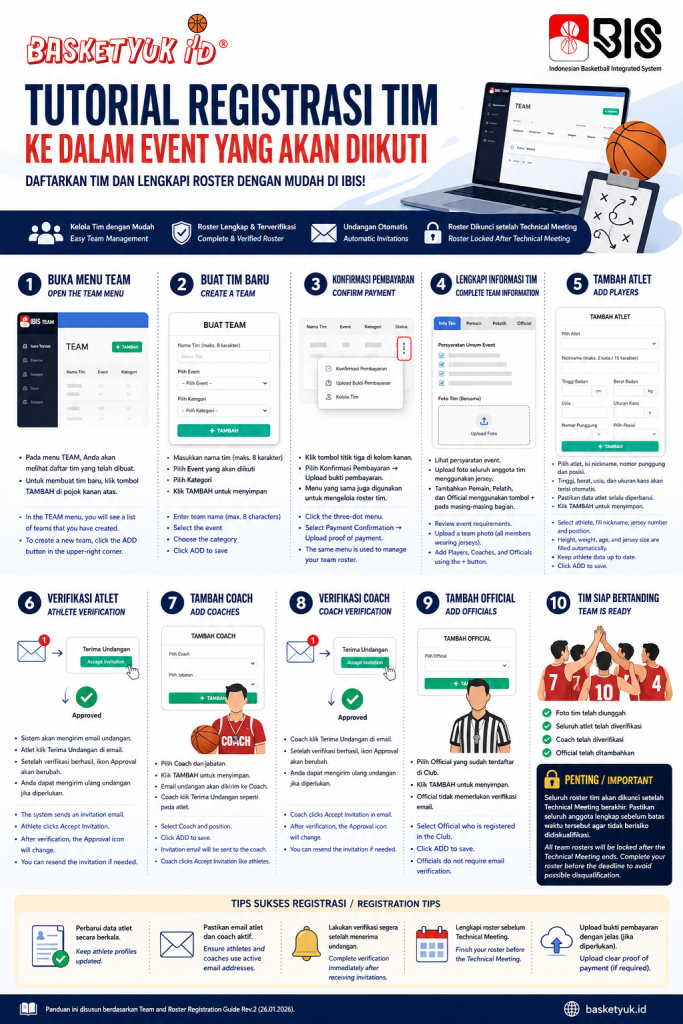
Cara Registrasi Tim ke dalam Event di Basketyuk
Mengikuti sebuah event basket kini semakin mudah melalui IBIS (Indonesian Basketball Integrated System) di Basketyuk. Setelah Club, Atlet, Pelatih, dan Official berhasil terdaftar, langkah berikutnya adalah membuat tim, memilih event, melengkapi roster, serta melakukan verifikasi seluruh anggota.
Panduan berikut menjelaskan seluruh proses mulai dari pembuatan tim hingga tim siap mengikuti pertandingan.
Persyaratan Sebelum Registrasi
Pastikan Anda telah memiliki:
Akun Club yang telah terdaftar.
Atlet yang sudah terverifikasi.
Pelatih (Coach) yang telah terverifikasi.
Official yang telah didaftarkan pada Club.
Bukti pembayaran pendaftaran (apabila dipersyaratkan oleh penyelenggara).
Langkah 1 — Membuka Menu Team
Masuk ke Dashboard Club kemudian pilih menu TEAM.
Pada halaman ini Anda akan melihat seluruh daftar tim yang pernah dibuat.
Untuk membuat tim baru, klik tombol Tambah di pojok kanan atas.
Langkah 2 — Membuat Tim Baru
Isi informasi berikut:
Nama Tim (maksimal 8 karakter)
Pilih Event yang akan diikuti
Pilih Kategori pertandingan
Setelah seluruh data benar, klik Tambah.
Sistem akan membuat draft tim sesuai Event dan Kategori yang dipilih.
Langkah 3 — Konfirmasi Pembayaran
Setelah tim berhasil dibuat:
Klik menu tiga titik pada sisi kanan daftar tim.
Pilih Konfirmasi Pembayaran.
Upload bukti pembayaran.
Melalui menu yang sama Anda juga dapat membuka halaman pengelolaan roster tim.
Langkah 4 — Melengkapi Informasi Tim
Pada halaman Team Detail tersedia:
Persyaratan umum event
Upload foto seluruh anggota tim menggunakan jersey
Daftar Pemain
Daftar Pelatih
Daftar Official
Gunakan tombol + pada masing-masing bagian untuk mulai menambahkan anggota tim.
Langkah 5 — Menambahkan Atlet
Klik tombol + pada bagian Daftar Pemain.
Lengkapi data berikut:
Pilih Atlet
Nickname (maksimal 2 kata atau 15 karakter)
Nomor Punggung
Posisi bermain
Data berikut akan terisi otomatis dari profil atlet:
Tinggi Badan
Berat Badan
Usia
Ukuran Kaos
Pastikan data atlet selalu diperbarui sebelum ditambahkan ke dalam tim.
Klik Tambah untuk menyimpan.
Langkah 6 — Verifikasi Atlet
Setelah atlet berhasil ditambahkan:
Sistem otomatis mengirim email undangan.
Atlet membuka email tersebut.
Klik Terima Undangan.
Lakukan proses verifikasi.
Setelah berhasil diverifikasi, ikon Approval pada daftar pemain akan berubah sebagai tanda bahwa atlet telah bergabung secara resmi.
Apabila email belum diterima, Admin Club dapat mengirim ulang undangan melalui tombol yang tersedia.
Langkah 7 — Menambahkan Coach
Klik tombol + pada bagian Daftar Pelatih.
Pilih:
Nama Coach
Jabatan Coach
Klik Tambah.
Sistem akan mengirim email undangan kepada Coach.
Coach wajib melakukan proses Terima Undangan seperti halnya atlet.
Langkah 8 — Verifikasi Coach
Coach membuka email undangan kemudian:
Klik Terima Undangan
Selesaikan proses verifikasi
Status Approval akan berubah otomatis setelah verifikasi berhasil dilakukan.
Langkah 9 — Menambahkan Official
Klik tombol + pada bagian Official.
Pilih Official yang telah didaftarkan pada Club.
Klik Tambah.
Berbeda dengan Atlet dan Coach, Official tidak memerlukan verifikasi email.
Langkah 10 — Tim Siap Bertanding
Apabila seluruh proses selesai:
Foto tim telah diunggah
Seluruh pemain telah diverifikasi
Coach telah diverifikasi
Official telah ditambahkan
Maka tim telah siap mengikuti pertandingan.
Penting
Seluruh roster tim akan dikunci setelah Technical Meeting berakhir. Pastikan seluruh anggota telah lengkap sebelum batas waktu tersebut agar tidak berisiko didiskualifikasi.
Tips
Agar proses registrasi berjalan lancar:
Gunakan data atlet terbaru.
Pastikan email atlet dan coach aktif.
Lakukan verifikasi segera setelah undangan diterima.
Jangan menunggu hingga Technical Meeting untuk melengkapi roster.
Simpan bukti pembayaran dengan jelas sebelum diunggah.
How to Register a Team for an Event on Basketyuk
The Indonesian Basketball Integrated System (IBIS) makes team registration simple and efficient. After registering your Club, Athletes, Coaches, and Officials, the next step is to create your team, select an event, complete the roster, and verify every member.
Follow the guide below to complete the registration process.
Prerequisites
Before registering a team, make sure you have:
A registered Club account
Verified Athletes
Verified Coaches
Officials already added to the Club
Proof of payment (if required by the organizer)
Step 1 — Open the Team Menu
Log in to your Club Dashboard and open the TEAM menu.
This page displays all teams that have been created.
Click Add in the upper-right corner to create a new team.
Step 2 — Create a Team
Complete the following information:
Team Name (maximum 8 characters)
Event
Competition Category
Click Add to save.
Your team draft will be created based on the selected event and category.
Step 3 — Confirm Payment
After creating the team:
Click the three-dot menu
Select Payment Confirmation
Upload your payment receipt
The same menu is also used to manage your team roster.
Step 4 — Complete Team Information
On the Team Detail page you can:
Review event requirements
Upload the official team photo (all members wearing jerseys)
Manage Players
Manage Coaches
Manage Officials
Use the + button to add members.
Step 5 — Add Players
Click the + button in the Players section.
Fill in:
Athlete
Nickname (maximum two words or 15 characters)
Jersey Number
Playing Position
The following information is filled automatically:
Height
Weight
Age
Jersey Size
Always ensure the athlete's profile is up to date before adding them.
Click Add to save.
Step 6 — Athlete Verification
Once saved:
The system automatically sends an invitation email.
The athlete opens the email.
Click Accept Invitation.
Complete the verification process.
After verification, the Approval icon changes, confirming the athlete has officially joined the team.
If necessary, the Club Administrator can resend the invitation email.
Step 7 — Add Coaches
Click + in the Coaches section.
Choose:
Coach
Coach Position
Click Add.
The system automatically sends an invitation email.
The coach must complete the Accept Invitation process just like athletes.
Step 8 — Coach Verification
The coach should:
Open the invitation email
Click Accept Invitation
Complete verification
The Approval status will update automatically once verified.
Step 9 — Add Officials
Click + in the Officials section.
Select an official who has already been added to your Club.
Click Add.
Unlike athletes and coaches, officials do not require email verification.
Step 10 — Your Team Is Ready
Your team is ready to compete once:
Team photo has been uploaded
All athletes are verified
Coaches are verified
Officials have been added
Important Notice
All team rosters will be locked after the Technical Meeting ends.
Complete your roster before this deadline to avoid possible disqualification.
Best Practices
Keep athlete profiles updated.
Ensure athletes and coaches use active email addresses.
Complete invitation verification immediately.
Finish your roster before the Technical Meeting.
Upload clear proof of payment if required.